Fix: Windows 10 Can’t type in search
RECOMMENDED: Click here to fix errors and optimize system performance
It is a pretty basic task for an operating system to allow its users to search for a specific file or application. However, some users are experiencing trouble with Windows 10 start search (or Cortana search). This issue prevents users from typing into the search bar of the start search. Some users cannot interact with the search box, they can’t click on it or type in it or paste anything in it whereas some users can use CTRL + V command to paste in the search but they can’t actually type in the search bar. This is obviously not an issue with the keyboard since the issue appears only with the Windows 10 start search. As you can imagine, this can cause a lot of problems for users.
 Windows Search
What causes the Search to not respond?
There are a few things that can cause this issue.
ctfmon.exe: This file is located in the system32 folder on your Windows. Ctfmon is the Microsoft process that controls Alternative User Input and the Office Language bar. The issue can appear if this file/service isn’t running. Running this file brings back the Language bar which fixes the issue.
Unresponsive Cortana: Sometimes the issue might be caused by unresponsive Cortana service. Cortana runs in the background and you can see it running in the Task Manager. Sometimes, for no apparent reason, these services can stop working and simply rebooting them fixes the issue.
MsCtfMonitor: This service is responsible for monitoring TextServicesFramework system service. Since TextServicesFramework system service is related to the text input, a problem with this service can cause this issue. A problem with the Text Service Framework will prevent you from typing in any of the Windows Modern Apps as well. So, if you are facing the same issue on the Modern Apps like the new Windows calculator then the most likely issue is with the Text Service Framework and not the Windows search.
Method 1: Run ctfmon.exe
Usually, the issue is caused because your Language bar is turned off. Ctfmon.exe is the file responsible for controlling this feature. So, running the ctfmon.exe file resolves the issue.
Hold Windows key and press R
Type C:\Windows\system32\ctfmon.exe and press Enter
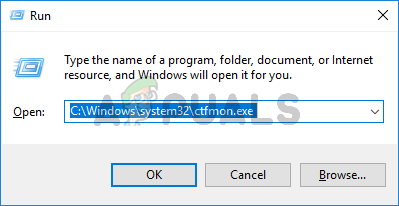 run ctfmon.exe via run
Running this file will fix the issue. You should be able to type in the Windows search.
Note: You might have to repeat these steps on every reboot (or every once in a while). So if you notice the problem is back then simply repeat these steps and you should be good to go. You can also follow the steps given below to make some changes in the registry so you don’t have to repeat this task on every reboot. However, we will suggest you wait a little bit to see if the problem comes back or not. If it does, then apply the solution given below
Press Windows key once
Type command prompt in the search bar
Right click command prompt from the start search and select Run as administrator
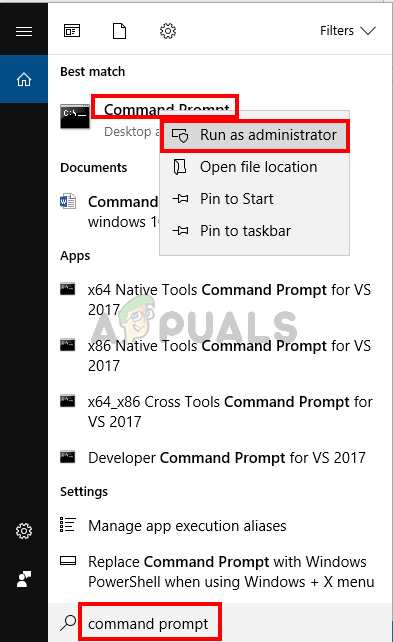 Open command prompt
Type the following and press Enter. Restart your computer and check if the error is resolved.
REG ADD HKLM\SOFTWARE\Microsoft\Windows\CurrentVersion\Run /v ctfmon /t REG_SZ /d CTFMON.EXE
 Run ctfmon.exe via cmd
Method 2: Reinstall All Default Apps
Sometimes this problem can be caused by an issue/corruption with the default apps of the system and simply reinstalling your default apps will fix the issue. Follow the steps given below to run a simple command that will reinstall the default apps for you.
Press Windows key once
Type command prompt in the search bar
Right click command prompt from the start search and select Run as administrator
 Open command prompt
Type PowerShell -ExecutionPolicy Unrestricted and press Enter
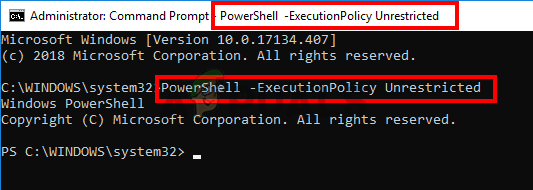 powershell with unrestricted access
You should be able to see the PowerShell –ExecutionPolicy Unrestricted appear on the top of command prompt now.
Type the following command and press Enter:
Get-AppXPackage -AllUsers |Where-Object {$_.InstallLocation -like "*SystemApps*"} | Foreach {Add-AppxPackage -DisableDevelopmentMode -Register "$($_.InstallLocation)\AppXManifest.xml"} Reinstall default apps via cmd in unrestricted PowerShell
This should resolve the issue for you. Note: If this doesn’t work then restart your computer and check again.
PRO TIP: If the issue is with your computer or a laptop/notebook you should try using Reimage Plus which can scan the repositories and replace corrupt and missing files. This works in most cases, where the issue is originated due to a system corruption. You can download Reimage by Clicking Here
If the problem still isn’t solved the follow the steps given below.
Press and hold CTRL, SHIFT, Esc keys simultaneously (CTRL + SHIFT + ESC). This should open the Task Manager
Click File and select Run new task
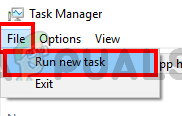 task manager: run a new task
Check the option Create this task with administrative privileges
Type Powershell and click Ok
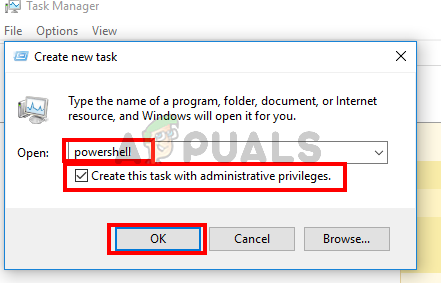 Run powershell via task manager
Type the following and press Enter:
$manifest = (Get-AppxPackage Microsoft.WindowsStore).InstallLocation + '\AppxManifest.xml' ; Add-AppxPackage -DisableDevelopmentMode -Register $manifest
 Reinstall Windows Store via powershell
Once the command is run, reboot and check if the issue is rectified or not. Note: If this doesn’t work then restart your computer and check again.
Method 3: End Task Cortana
Since Cortana runs in the background and it keeps running in the background, the issue can be caused by the Cortana itself especially if it stops responding. A lot of users fixed the issue by simply stopping the Cortana via Task Manager. You don’t have to worry about restarting Cortana, it automatically starts itself after a while. So, follow the steps given below to End Task Cortana.
Press and hold CTRL, SHIFT, Esc keys simultaneously (CTRL + SHIFT + ESC). This should open the Task Manager
Locate the Cortana service from the Processes list. If you can’t find Cortana in this list then select the Services tab and check there
Locate and right-click Cortana
Select End Task
 End Task Cortana via task maanger
This should rectify the issue. The search should be working fine now.
Method 4: Import MsCtfMonitor.xml from another Windows 10
MsCtfMonitor is a Microsoft’s own task with the sole purpose of monitoring the TextServicesFramework system service. The TextServicesFramework system service provides a simple and scalable framework for the delivery of advanced text input and natural language technologies. In some cases, the MsCtfMonitor scheduled task might not be started or it might have gotten corrupted which leads to this issue. Simply running the MsCtfMonitor task or importing the MsCtfMonitor.xml file from another Windows 10 machine with its search working properly.
Log in to another Window 10 PC
Hold Windows key and press R
Type taskschd.msc and press Enter
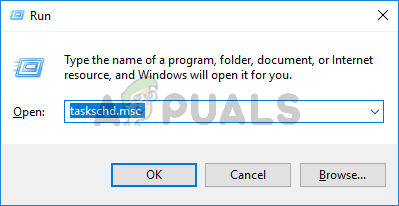 Run task scheduler
Double-click Task Scheduler Library from the left pane
Double-click Microsoft from the left pane
Double click Windows from the left pane
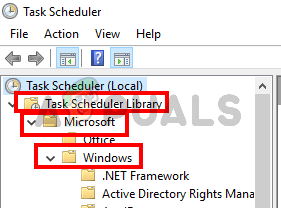 Open TextServicesFramework
Select TextServicesFramework from the left pane
Right-click MsCtfMonitor from the mid pane and select Export…
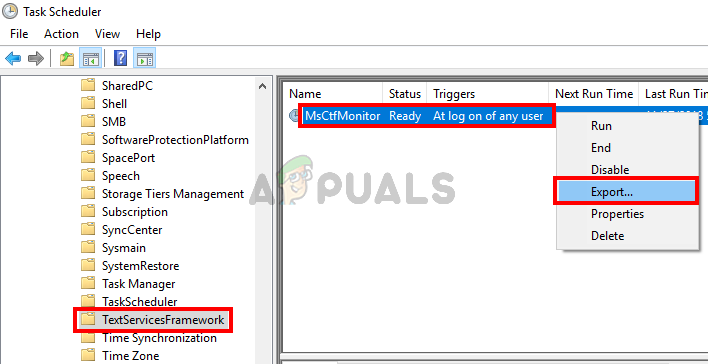 Export MsCtfMonitor task
Select a location that you can remember and click Save
Copy this exported file to a USB and paste it to the problematic pc
Repeat steps from 1-7
Right click on an empty space in the mid pane and select Import…
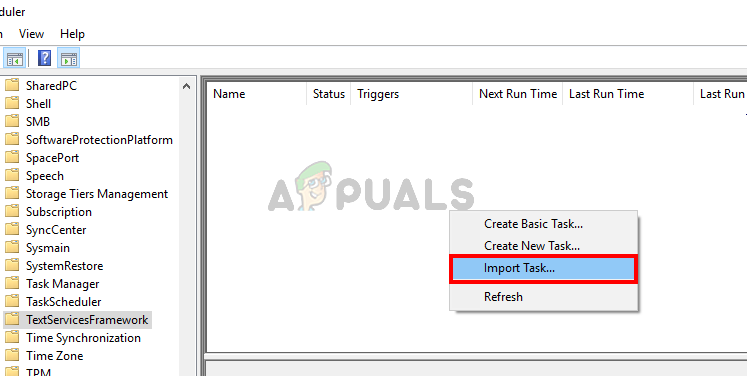 Import MsCtfMonitor task in task scheduler
Navigate to the location where you pasted the MsCrfMonitor.xml file from the other machine and select it
One imported, right click the file from the mid pane and select Run
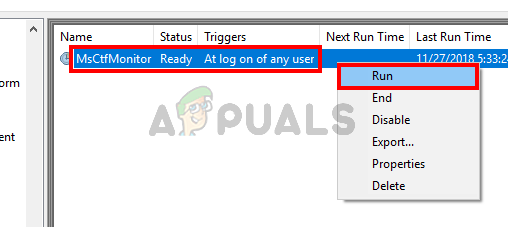 Run MsCtfMonitor task
The problem should go away once the task is up and running.
TIP: If none of the Methods have resolved the issue for you, we recommend using Reimage Repair Tool which can scan the repositories to replace corrupt and missing files. This works in most cases, where the issue is originated due to a system corruption. Reimage will also optimize your system for maximum performance. You can download Reimage by Clicking Here
Similar Posts
Requires Login
